Chianti Caramel and Salted Dark Chocolate Crack


Cioccolato. Chocolat. Chocolade. Čokolada. Chocolate. Is there a more beautiful word? Especially when used in a sentence with Chianti and salt and caramel? I don't think so. And I'd be willing to debate anyone who thinks otherwise. This is definitely not a healthy dessert. Some might even say that's a contradiction of terms (I do have some healthy desserts up my sleeve, but this isn't one of them). This is called crack for two reasons. One is that it's addicting, and the other is that you crack it to break it up at the end. Also, I feel like I say this all the time, but anything that has wine definitely has my attention. Add chocolate, and I'm so there it's not even funny...

Start by spraying the largest cookie sheet you have with cooking spray. IMPORTANT: if your sheet isn't nonstick, put parchment or wax paper down, otherwise you'll have a sticky mess that won't come off the pan. Then lay as many saltines as you can fit on the sheet with the salt side down in rows. Do this before you start your caramel because once it's ready, you have a small window of time to get it from the pot to the crackers before it hardens. Next preheat your oven to 475 degrees F. In a large skillet or sauce pot (depending on how high the sides of your skillet are), melt two sticks of butter over med-high heat. Once the butter has melted, add 1 cup of dark brown sugar. What? I told you this wasn't healthy. 


So now the dessert fairy turns the butter and brown sugar into caramel. This will bubble and be constantly darkening in color, and you need to be constantly stirring it. Boil for 1-2 minutes, then add 3/4 cup of Chianti and another 1/3 cup of brown sugar. Keep stirring and DON'T leave it, or your sugar will burn faster than you can say strawberries for "dessert." Notice the nice pink color the wine adds? I will also say that at this point, you can seriously burn yourself, so no dogs, kids, or other moving objects flying around the kitchen. Boil another 1-2 minutes until the sugar has dissolved (TayTip: if you don't trust your timer or yourself, use a candy thermometer. The caramel will be done when it's reached 234 degrees F). Then take your pot and pour the Chianti caramel over the crackers. Don't worry about covering every square inch because it will spread out in the oven. Bake for 4 minutes; this is to toast the crackers and make a uniform layer of caramel.


Now for the chocolate. I used Ghirardelli semi-sweet morsels with a 60% cacao count. You can go darker, but anything over 70% will most likely be too bitter. I also wouldn't recommend milk chocolate for this particular recipe. I'm usually all for deviating from the beaten path in the kitchen, but trust me on this one: you need dark chocolate. Sprinkle 2 cups of morsels right onto the hot, caramel-covered, crackers. The residual heat will melt it; this takes about 5 minutes. Once it's melted, use a rubber spatula or offset spatula to spread it in an even layer. The last step is to sprinkle fleur de sel (use sea salt if you don't have any, but don't use iodized...you need large granules) all over the melted chocolate before it's hardened. Stick the pan in the freezer for a minimum of 45 minutes so the chocolate and caramel can set.


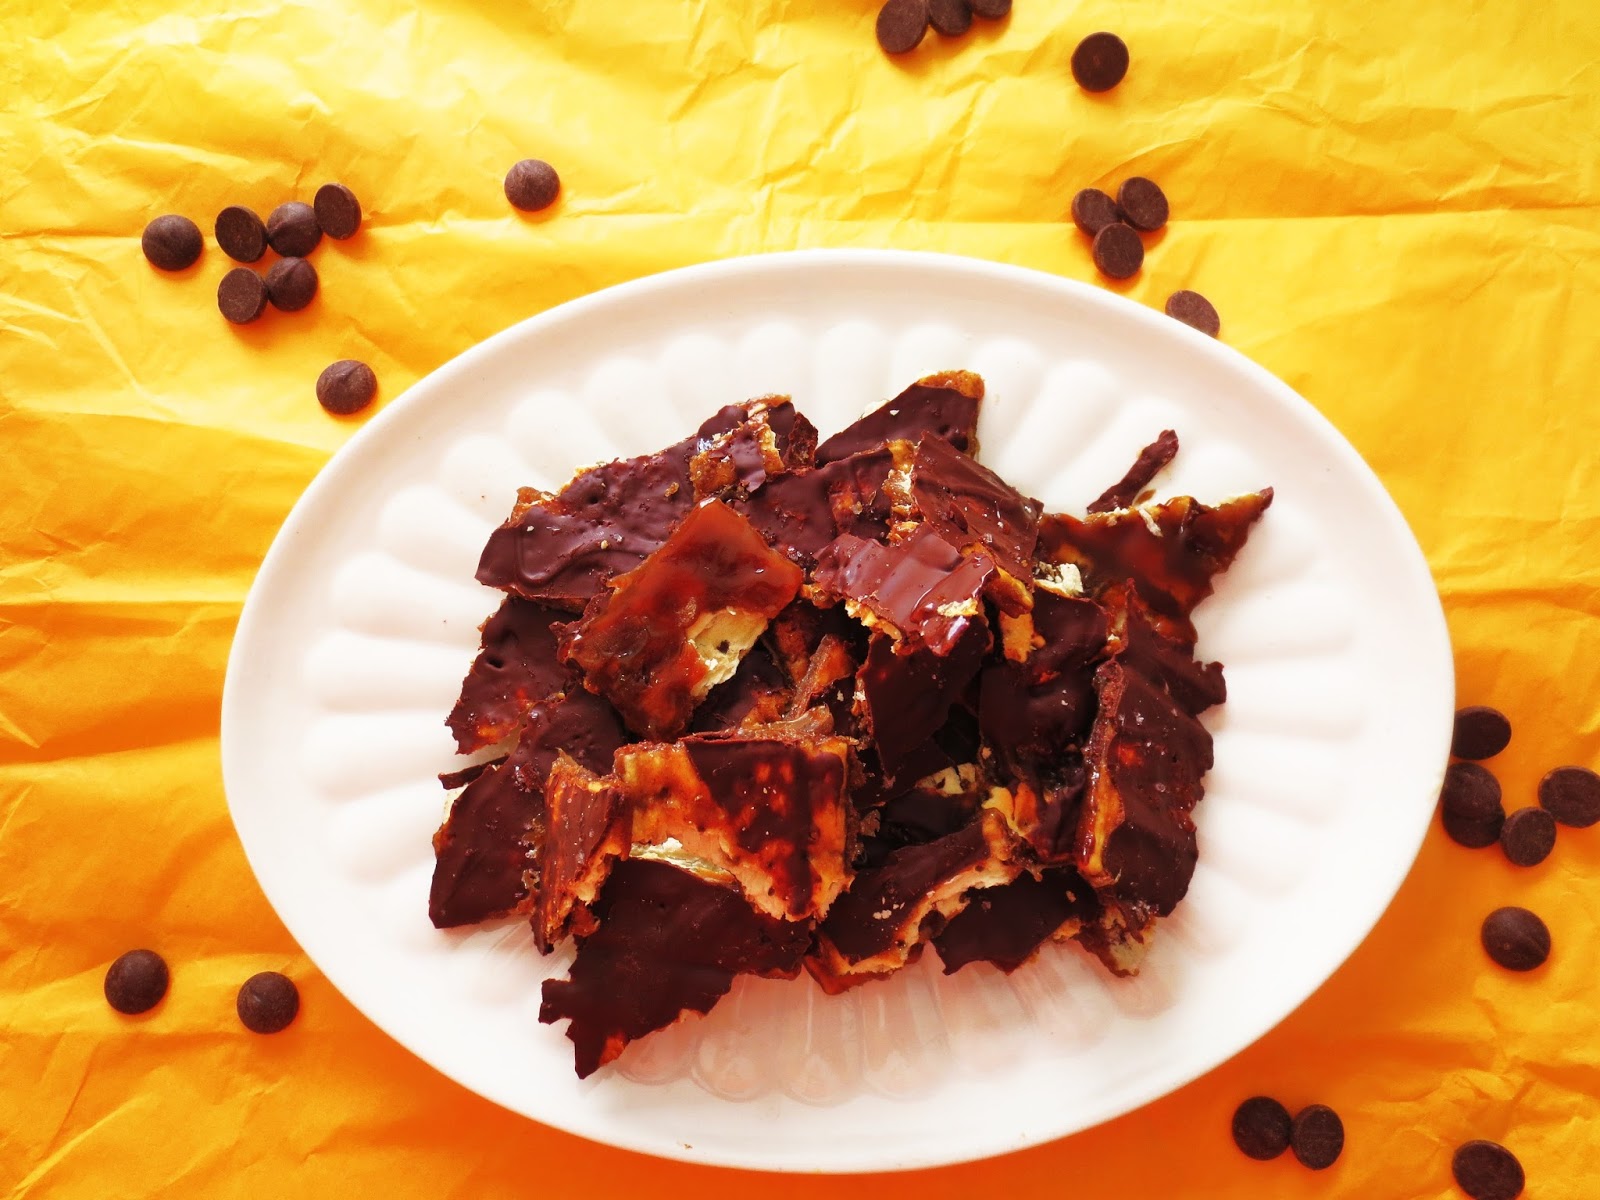
You will know the chocolate is completely tempered when it doesn't have a shine, but rather a matte finish. Take a butter knife or offset spatula and slide it under the crack, which will probably be in one giant sheet, and break it up to your heart's content! No rules or size specifications for the pieces. Store in an airtight container or ziploc bag in the fridge or freezer for long term storage.

Gooey. Glossy. And gorgeous. Do yourself a favor RIGHT NOW, and click on the pictures to enlarge them. Then click again to zoom. You're welcome. 


Salty and sweet and wine and chocolate. This is dessert royalty, people. I bet you wouldn't think I'd describe it as light--because it isn't--but the saltines add an airiness that normal toffee or brittle doesn't have. Basically, it's less dense. Serve on ice cream, with whipped cream, by itself, or on a shoe. I guarantee it'll be equally as good in any of those scenarios. Go make it, then go on a walk if you're feeling guilty. 

Questions, comments, and recipe requests below. Buon appetito!

Weeknight Indulgence: Gnocchi with Sweet Basil Marinara


If you haven't noticed lately, I've been eating a lot of vegetables. Like this, or these, or here, or these. As in basically only vegetables for the past week. That's because they were going to go bad I love them so much. Thus, I figured I'd treat myself with a few carbs and still throw in some fresh vegetables so I wasn't totally off the tracks. Pronounced: n-YAW-kee and traditionally made with semolina flour or potatoes. They're soft, dense pillows filled with comfort, and are definitely an indulgence. 

Start by heating 2 quarts of water over high heat to boil and add 2T of salt. Then in a separate skillet, melt 2T of butter on high heat. Dice 1/2 large red onion and saute for about 6 minutes or until softened. Then dice 1 clove of elephant garlic. This is garlic the size of shallots, and the flavor is very mild. Almost negligible. (TayTip: anytime you're cooking for a picky garlic eater, use elephant garlic; the flavor is so small, they will barely be able to taste it, but it will still give it's slightly spicy, sharp bite) Then dice three large tomatoes and throw them into the pan. Cook for 15 minutes on high or until tomatoes have softened substantially. Finally, salt and pepper to taste, and add 2T of dried sweet basil. Of course fresh herbs are always best, but the flavor of dried herbs is much more concentrated, and is helpful when putting something together fast. 

Once the water is boiling, add 1lb of packaged gnocchi and cook for 3-5 minutes, or until they rise to the surface. If I had time and patience, I'd make my own, but we're going for luxury here, so buy them pre-made. Once they float, they're done. Use a slotted spoon, or a spider to remove from the water, and toss right into the hot marinara. 


Top with freshly grated parmigiano reggiano. Remember, this is an indulgence, so use the good kind. Aren't you worth it? 


These gnocchi are little clouds of heavenly dough. They soak up the sauce like a sponge, and become completely infused with the sweet basil and tomato flavors. Dense and sticky, they're like little pasta truffles. The cheese is an ideal, salty topping, and melts instantly upon contact with this perfect comfort dish. 

What are some of your favorite comforting dishes? Do you have a go-to indulgence? Leave your comments, questions, or recipe requests below. Buon appetito!

Food Nostalgia: Cucumber and Red Onion Salad with Sweet Vinegar Dressing


My grandma used to make this for summer dinners growing up. If you can't already tell, I am heavily influenced my both of my grandmothers' and my mother's cooking styles. Cooking is not only about nourishing your body, taking care of your loved ones, and having a creative outlet, but for me, it's also about nostalgia and recreating a moment. You know how smells trigger memories? Like every time I smell the smoke from someone's fire, I think of when my family spent Christmastime in Williamsburg when I was younger. Or how peonies take me back to summers on my great-grandparents' farm in Petersburg because my MeeMaw grew them. Well food is the same way. Every time I make this salad I'm transported back to childhood, and for a moment, I'm a kid at my grandma's table again. Too little to see over the counter tops  but old enough to feel and appreciate the palpable love around. Isn't that one of the great things about life? Being able to relish and be grateful for times spent with the people who matter most? Just a little food philosophy for your Thursday. Here's how I learned it.

Start by slicing 3 large cucumbers as thin as you can get them. Use a mandolin or cheese slicer if you have them. If not, take your time with your knife. These came from my grandma's garden, which obviously makes them even better for many reasons. My mom would tell you to peel them first, (which you can do if you're picky about the skins) but I like the taste the skins add and that's where the majority of vitamins are. Immediately shower them with 1/2 cup of red wine vinegar, 2tsp of salt, 2tsp of pepper, and 1.5T of sugar. Mix them around so that they are coated with the dressing. 


Then add 1/2 of a red onion, sliced into 1.5 inch pieces. This is my own twist; grandma didn't put onion in hers, but I like the potency of red onion with the sweet cucumbers. Also add 2T of mayonnaise and mix until all ingredients are incorporated. The dressing will be very runny. 


Let it sit for a minimum of 20 minutes so the flavors can meld (as with most marinated salads/meats/fish, a few hours is best), but if you need to serve immediately, make sure you get a good amount of dressing on everyone's plate. 


Crisp, crunchy, tangy, sweet, and childhood. All in one salad. Do you have any recipes that instantly transport you back to being a kid? What memories do you recreate in the kitchen? Comments, questions, and recipe requests below! Buon appetito!

Snacketizer Part Four: Eggplant Fries with Honey


Part 4 of 4 in the vegetable snack series! There are only 4.8 carbs in 1cup of eggplant, and there are 37 carbs in one medium potato. Pretty much speaks for itself! So clearly, eggplant makes the healthier option, but potatoes make better snacks. I'm here to prove the latter wrong!

Start by preheating the oven to 325 degrees F, then slicing the eggplant into uniform, fry-sized pieces. Try to keep skin on as many pieces as you can. Place the pieces in a Ziploc bag and add 1.5T of olive oil, 1tsp of salt, and 1tsp of pepper. Massage the bag until all the pieces are coated. Place the fries in a single layer on a cookie sheet, making sure they don't touch each other. Bake for 35 minutes at 325, then turn heat up to 375 and bake for an additional 20 minutes or until the fries are no longer mushy and have turned golden.


Serve with a small cup of warm honey for dipping. 


These are firm and the skins are crisp. If you had a couple pieces that were bigger than the others, they might still be soft and not hold up. The pepper and honey create a classic, sweet and spicy combination on the palate. Plus, if you've ever had baba ganoush, you know how good roasted eggplant is. If you haven't, make these fries instead!

Comments, questions, and recipe suggestions below! Buon appetito!

Snacketizer Part Three: Roasted Red Pepper Hummus


Part three of four! Hummus is right up there alongside guacamole and salsa as a quintessential dip. It's also incredibly simple, and you only need a few, key ingredients (that most people already have in their kitchens) to make it.

Start by draining and rinsing two 15oz. cans of chick peas. This gets rid of the salty water that they're packed in. Toss them into a food processor with 2T of sesame oil and the juice of 4 small limes, which is about 1/2 cup. (TayTip: since limes don't have seeds, use the top of the blade in your food processor as a citrus reamer to get the most juice out!) Hummus is traditionally made with tahini paste, which is just ground sesame seeds, but I find that the sesame flavor isn't as prevalent when using tahini. Thus, the reasoning for the oil instead. Pulse until the chick peas are broken down. 


Next add two whole roasted red peppers. These are red bell peppers (not hot) that have been roasted over a flame or under a broiler. The best way to make your own is if you've got a gas stove with an open flame, but since mine's electric, I buy them in the jar. They're packed in a vinegar and water mixture, so drain them and toss them into the processor with 2tsp of salt and 2tsp of black pepper. Then add two garlic cloves and puree until the chick peas are broken down further. Depending on whether you like smooth or thick, you can add more olive oil, but no more sesame oil because the flavor would be too overpowering. I just love the color that the peppers add. If you look in the picture below, you can see the difference in where the peppers are incorporated/not incorporated into the hummus yet.


Perfectly smooth with a  mildly sweet, charred flavor from the peppers. It tastes like you threw in the good kind of flavor that a grill imparts. The sesame oil adds an unexpected toasty aroma, and the lime juice gives a nice pucker. Chick peas are virtually flavorless, so it's important to build a complex profile with these different ingredients. Serve with chips or crudité.


Questions, comments, and recipe requests below! Buon appetito!

Snacketizer Part Two: Roasted Spicy Squash Seeds


Part two of the series! Here is a classic case of use what you got, which is basically my MO 90% of the time. This is the first time I've ever roasted squash seeds because I normally use pumpkin or sunflower seeds. But because I made the spaghetti squash a few days ago, I had these leftover. They are packed with protein and incredibly versatile. Eat them by themselves, in a salad, on top of a crostini, wherever!

Take your seeds (I had 1 cup) and place them in a colander. If you haven't already, separate them from any squash pieces and rinse them with water. Dry your seeds and place them in a Ziploc bag. Drizzle with 1T olive oil, 1tsp salt, and 1.5tsp of ground cumin. This is the spicy part. Place them in a single layer on a cookie sheet and bake at 325 degrees F for 20-22 minutes or until they have turned a golden brown color.


They definitely satisfy the mental hand to mouth aspect of snacking, and bridge the gap between meals. I've even had people tell me they ate these when they were quitting smoking, and it helped with the nicotine cravings. They are super crunchy and have the perfect amount of spice from the cumin.

Write your questions, comments, or recipe requests below. Buon appetito!

Snacketizer: Kale Chips


It's a snack. It's an appetizer. It's a snacketizer? Yes. In keeping with the low carb, high veggie, high protein way I've been trying to eat, I decided that I needed a snack. Plus, there comes that time after lunch, and before dinner that you just want something to munch on. This is part one of a four part series on vegetable snacks. 

First are kale chips. I'd equate the texture of these to dried seaweed. If you've ever had that salty snack, you know how crispy it is. These kale chips are the same way! This kale came from my grandma's garden, and it's the small curly kind. First get a large bath towel and lie it flat on the counter. Then wash your kale thoroughly. The curls trap dirt and bugs, so you need to make sure all of that is out. Once it's cleaned, lie it on the towel to dry. Now, you need to separate the leaves from the stalks. Tear them into chip-size pieces, return them to the colander, and rinse again. Then transfer back to the towel and pat them as dry as you can get them. Next, take a salad spinner or cloth lettuce bag and get out any remaining water. Or, if you're like me and don't have either of those items, use a pillowcase. Place the kale inside, twist the top of the pillowcase, go outside (or somewhere you don't mind getting wet), and swing the bag around to get the water out. Preheat your oven to 325 degrees F. Place the kale as single layer on a cookie sheet. I had so much that I needed 3! Drizzle with olive oil and bake for 18-20 minutes. As soon as the kale has darkened in color and is crisp, remove it from the oven. I sprinkled mine with lemon Old Bay seasoning. (TayTip: always season fries, chips, etc., when they're right out of the oven or fryer. This helps the salt or seasoning stick.)


Crispy and salty and fantastic. Who knew a green leafy vegetable could make such a good chip?

Add your questions, comments, suggestions, and recipe requests below. Buon appetito!

Roasted Spaghetti Squash with Crushed Tomato Marinara and Sweet Italian Sausage


Let me just preface this post by saying that never-have-I-ever had a substitute for spaghetti that was this good.  And I was raised on pasta. As in, we had it more than one night a week growing up. Pasta definitely fills you up and tastes delicious, but the problem with eating a main course that is mostly carbs is that you feel hungry a LOT sooner after eating. That's why balancing fiber and protein in your meal is imperative. This low-carb dinner does the trick!

Roll up your sleeves, and start by prepping your squash. Just a warning: this is hard. If you've ever tried to carve a pumpkin, or cut a butternut squash, you know how tricky gourds can be. Just take your time and be careful; it's easy for your knife to get away from you when slicing through the flesh of the squash. Cut your spaghetti squash in half lengthwise until you have two pieces. Take a spoon, and scrape out the seeds, but don't throw them away; you can season and roast them for a perfect snack or in salads! Recipe for that to come later. You can see the delicate strands that make up the flesh of the squash. Season with olive oil, salt, and pepper, place them flesh side down on an oiled cookie sheet, and set in a 400 degree F oven for 30-35 minutes. 


While your squash is roasting, it's time to make the base for your crushed marinara. The texture of this sauce is incredibly substantial, and when you don't have the real pasta, you'll want something with a little bite to it. Melt 1T butter in a non-stick saute pan over med-high heat. Dice 1 large white onion, and 4 medium cloves of garlic and add to the pan. Cook until onions are somewhat caramelized and translucent. Then chop 7 large, vine-ripened tomatoes and throw in the pan with the onions. Add 1tsp salt, 1tsp ground black pepper, 1/2tsp crushed red pepper flakes, and 2tsp dried Italian herbs (these usually have oregano, basil, thyme, etc.). Cover and reduce heat to medium; cook for 20 minutes, using the back of a wooden spoon, periodically, to break down tomatoes. 


In a separate pan (I use a cast iron skillet), brown 5 large, sweet Italian sausages over high heat. (TayTip: to cook perfect sausages, always have a full measuring cup of water next to the pan. Pour about 1/2 cup in with the sausage. This allows them to cook more evenly without burning the outsides. When the water evaporates, add more. Continue this for approximately 15 minutes, then let the last batch of water evaporate and brown up the outside edges of the sausage.) Transfer the entire contents of the marinara sauce in with the sausage, and reduce heat to low. Cover, and simmer for an additional 20 minutes. The sausage will finish cooking in the sauce, but depending on your pans and stove, you'll want to make a small incision in the middle of one to make sure they're fully cooked (no longer pink). 


When your squash is done, remove from the oven, and let it cool for 10-15 minutes. Once cool, take a large serving spoon, and scoop the strands from the skin. Transfer to a large bowl and drizzle with 1T olive oil. Salt and pepper to taste. See the strands! Just like real spaghetti!


When the sauce has finished cooking, I like to scoop some of the squash strands back into the skins to serve. They're just like bread bowls from Panera, and make for a great presentation. Top with as much grated parmigiano reggiano as your little heart desires. 


This is a great meal to show off your ingenuity in the kitchen. You'll be amazed at how great a substitute it is for actual pasta. The squash is not overcooked (nobody likes mushy baby food), and gives a little resistance when biting down. It really doesn't have much of its own flavor. You get a little bit of a pumpkin/butternut squash flavor, but for the most part, it takes on the taste of the marinara, which by the way is perfectly savory. Sometimes when I make marinara, I'll add a little bit of honey to offset the acidity, but given the natural sweetness of the squash (and the sausage), I decided not to. The tomatoes are crushed and smushed and wonderfully hearty with a nice kick from the crushed red pepper. And lastly, the sweet Italian sausage. If you've had it, you know what I'm talking about. If you haven't, go buy some. These are from this wonderful shop in Arlington, VA, that my grandma used buy from when she lived there. She used to serve these for Christmas dinner with spaghetti and meatballs or her famous lasagna. The gentle fennel seed flavor is really the mark of a good sweet sausage, and it comes through with stunning clarity against the other flavors.  This is such a great meal. I felt fully satisfied, wasn't hungry later, and heck, anytime you can use a vegetable in place of a grain, I'm definitely in. 

Questions, comments, concerns below. Buon appetito!

Simple Supper: Chicken and Chorizo with Spinach, Sun-Dried Tomatoes, and Monterey Jack


Raise your hand if you're busy. Now raise your hand if you're hungry. Now raise you're hand if you're both. Good thing I'm here to solve all your problems. Well, the aforementioned, at least. This is a variation on a meal I invented a few years ago. The old one included pasta, but since I'm trying to eat low-to-no-carb, I cut out the pasta altogether, and I will say that this simple dinner is equally as satisfying. Creating recipes and trying out different, and unique flavor combinations is kind of my thing. I get really, really excited when they work out well, and this is an example of one time when I really didn't know how it was going to turn out. Let me tell you, it would taste good on a shoe.

Start by preheating a 12-Inch Cast Iron Skillet over high heat. Next, take 3 links of Argentinian Style Chorizo Sausage  out of the casing.  Chorizo is a seasoned sausage used in Spanish and Latin American cooking. It has, however, made its way in the hearts of Americans. Its main ingredients are pork and paprika, though they add some other spices and garlic. (TayTip: To easily remove the sausage from the casing, make a separation in the middle of the link with your fingers. Then twist a few times, and squeeze the two separated portions out each end.) Place in the skillet to brown for about 10 minutes. This is a high fat sausage, so there is no need for any oil in the pan. In fact, you will have too much oil, so my trick for getting rid of that without a greasy stack of paper towels at the end is to store your sausage in a container with a spout. I use a Pyrex 2-Cup Measuring Cup and cover it with foil. That way when you go to pour out any residual grease, the foil keeps the sausage from falling out. 

Once your chorizo is out of the pan, there will still be a lot of grease in the actual skillet. Pour out all but 2T of that. Then take 10 boneless, skinless chicken thighs and season with salt and pepper. Reduce the heat to medium-high, and place the thighs in the skillet. Cook until meat is no longer pink, or the internal temperature is 165 degrees F. This takes about 15-18 minutes. Next, open an 8.5oz. jar of Sundried Tomatoes In Olive Oil and place it upside down in a mesh strainer over a bowl or container. Since there is already a little bit of oil from the chorizo, you want to make sure you let as much oil drip off the tomatoes as possible. While the chicken and tomatoes are doing their things, you'll want to grate about 1.5 cups of Monterey Jack Cheese. I use this Grater because of the variation in sides and grating style. 


Once the chicken is fully cooked, remove it from the pan, and cover it with foil to keep it warm. Clean the skillet with warm water only, and return it to medium heat. Next add 1 lb. of fresh Spinach and cook until wilted. Will produce 2 cups cooked. Take it from the pan, place in a Colander, and use Tongs squeeze out any water left. 


Scatter the spinach as a bed on a large serving platter. In a separate bowl toss chicken, sausage, and tomatoes until incorporated. Top with cheese and allow time to melt. And lastly, squeeze the juice from one lime on top of the entire platter. 


This is quite the hearty dinner by nature with two kinds of meat. But the spinach and lime juice really work against the richness of the dark meat chicken and the chorizo. Which, by the way are slightly seasoned, and incredibly full of spice, respectively. The chicken is incredibly moist and springs apart when you bite down. The spinach, while low in flavor, is full in vitamins and adds a good variety in texture. The sun-dried tomatoes are intensely sweet and slightly tart at the same time. The monterey jack melts wonderfully, and I chose this mild cheese so as to not be an overpowering, conflicting flavor with the strong chorizo and tomatoes. And lastly, the lime juice adds a brightness needed to lift the flavor profile of the entire dish.

Comment below with questions/concerns/ideas. Buon appetito! 

Cheddar Stuffed Lettuce Burgers with Spicy Mayo


The first thing I'm going to say is that you will NOT miss the bun. Honestly. Seriously. Literally. You won't. How do I know this? Because I didn't miss it. And this is coming from a person who would much rather have a piece of crusty bread over a cookie. As in, I like bread. A lot. But in the vein of healthy eating, I decided to lighten up my dinner some by getting rid of it. And I wasn't going to be the girl who ate her burger with a knife and fork, so the lettuce as bread was perfect. I know this isn't exactly a novel idea, but it works for me. And it's a great way to cut out extra carbs, especially in your kids diets! And the best part? I made it in 10 minutes...

The only pre-planning is to take your meat out of the fridge for about 10 minutes before you touch it. This is because you never want to shock cold meat in a screaming hot pan. Start by heating up a pan on med-high heat. Then, form your beef (Since I was nixing the bread, I used beef with a little higher fat count than I typically do: 80/20) into two, flat, 3 oz patties about 3/4 inch thick. Like dough, meat becomes tougher the more you work with it, so no kneading here; just be gentle. In one patty, create a small well in the middle, and add 1 oz of shredded cheddar cheese (use more or less depending on how cheesy you're feelin'). Then lay the other patty on top and seal the edges as securely as you can with your fingers. Place it in the pan and don't touch it for three minutes! If you move it around in the pan, you'll lose the crust on the surface of the burger. While it's cooking, assemble your plate with whatever toppings you like. I was going for simple here, so I mixed 1/4 tsp of paprika with 1T of mayonnaise and spread that on one piece of romaine lettuce, sliced a tomato and onion and placed them on the other piece of lettuce. 


After three minutes, flip your burger and cook for another 3 minutes for medium rare, 4 for medium, and 5-6 for well done. I did mine medium rare. (TayTip: NEVER press down on your burger with your spatula because it releases the natural juices from the meat. Natural means flavor!) Set it on top of your lettuce and dig in!


This is an ideal way to still be satisfied while eating low-carb. You can also use ground turkey or bison which are even leaner meats, but like I said, you have to indulge somewhere, right? I use extra sharp cheddar because it doesn't get lost in the mix of juicy meat, crunchy onions, or bursting tomatoes. The spicy mayo is a nice kick and the lettuce is deliciously crisp. Kid friendly, and Taylor approved. I'm not ashamed to say I licked my fingers...and part of the plate. Buon appetito!

Popular Posts

Followers

Copyright Taylor Maria Schultes 2013. All rights reserved. Powered by Blogger.