Showing posts with label vegetables. Show all posts

Heirloom Tomato Pie with Fresh Basil and Fontina


I can eat a tomato like an apple. Juices running down my wrist, and a smile on my face. Some might think this is weird, but when you live right next to Hanover County, Virginia, tomatoes are like a way of life. There's a joke in my family that goes something like "There are three cops in Hanover for every tomato." It's pretty much true, but as long as the County keeps that sandy coastal-plain soil, which produces the concentrated flavor in Hanovers, I don't mind a couple of cops. 


Anyway, like I was sayin', tomatoes are the fruit of the summer. You can barbecue them, boil them, broil them, bake them, saute them. Dey's uh, tomato-kabobs, tomato creole, tomato gumbo. Pan fried, deep fried, stir fried. There's pineapple tomatoes, lemon tomatoes, coconut tomatoes, pepper tomatoes, tomato soup, tomato stew, tomato salad, tomatoes and potatoes, tomato burger, tomato sandwich. That...that's about it. 

http://www.moviequotesandmore.com/image-files/forrest-gump-quotes-9.jpg

Well as Bubba I was saying, tomatoes are versatile. And when you've had a long day it helps to have something easy to prep and that doesn't take a long time to cook. Plus, you're getting your "veggies" in spades.


Heirloom Tomato Pie with Fresh Basil and Fontina

  • 6 heirloom tomatoes of varying colors if available
  • 2 packages thawed puff pastry (try Dorset Pastry brand) 
  • 3-4 cups grated fontina cheese
  • 1 white onion, chopped
  • fresh basil
  • disposable pie pans
  • olive oil to grease pie pans
  • salt and pepper
Note: Please buy all organic ingredients, if possible.

Instructions:

Preheat oven to 350°. Slice heirloom tomatoes 1/4" in thickness and lie flat on a stack of paper towels for about 10-15 minutes. We want the tomatoes to dry a bit so that you don't have a soggy dough. Coat pie pans with a thin layer of olive oil. Lie one sheet of puff pastry in each pan and cut so that pastry fits in a circle around the edge. Take excess pastry and use to mold into cracks/crevices. Season top side of tomatoes with salt and pepper, and place one layer of tomatoes seasoned side down on top of the dough. Salt and pepper the other side. Sprinkle some of the chopped onion and roughly torn fresh basil. Cover with a moderate layer of grated fontina. Repeat with a second layer of tomatoes, cheese, onions, and basil until the pie reaches the top of the pan, but doesn't overflow. Bake at 350° for 30-45 minutes or until dough is cooked all the way through and cheese has browned on top. Makes three pies.


Buon appetito!

Herbed Chicken Noodle Soup


Chicken noodle soup is right up there with mac and cheese, mashed potatoes, and chocolate in the comfort food lineup. There's just something soothing about a warm bowl of soup. Who can resist protein-filled broth infused with herbs, soft noodles, delicate veggies, and tender chicken? I certainly cannot...

Start by heating your oven to 375 degrees F. In a large soup pot, heat 1T butter, uniformly chop 4 large celery stalks, 4 large carrots, and 2 large yellow onions; add this mirepoix (meer-pwah) to the pot, and sauté until all the veggies are soft. While the vegetables are cooking, combine 1/2 stick room temperature butter with 1T chopped fresh sage, 1T chopped fresh thyme, and 1T chopped fresh rosemary in a small bowl. Add a pinch of salt, and a few cracks of black pepper to the butter. Place your whole chicken in a large dutch oven or cast-iron pot. Now take the herb butter and use your hands to rub it under the skin of the chicken, making sure to coat the breasts as well as the legs. Rub any remaining butter on the outside of the chicken. Quarter an additional yellow onion, cut 2 more carrots into thirds, and stuff them into the cavity of the chicken; leave any onion or carrot pieces that won't fit inside the bird in the pot. Then fill the pot halfway up the chicken with a dry red wine. I used cabernet sauvignon. Cover and bake for 1.5 hours or until the internal temperature of the chicken at the thickest part reaches 165 degrees F. 


 Once your mirepoix has finished cooking, add 2 quarts of low-sodium chicken broth to the pot and bring to a boil. Add 2T each of chopped fresh parsley, sage, rosemary, and thyme (hello Simon & Garfunkel) to the broth. (TayTip: to infuse your broth with another layer of flavor, finely chop and add the celery leaves from your stalks. They really drive home the tangy flavor of the celery.) Once your broth is boiling, add 3/4 of a large bag of egg noodles; one whole bag if you like your soup extra noodle-y. Add 2 1/2 tsp of salt, and 1T of cracked black pepper. Cook until the noodles are al dente, then reduce the heat to warm. When your chicken has finished roasting, remove it from the dutch oven, and place it on a cutting board to cool for 15 minutes so that you won't burn your fingers when chopping it. Pour the cooking liquid from the chicken into the broth with the noodles. When your chicken has cooled, remove the breast and leg meat, dice into whatever size you like, and add to the soup. 


SIDE NOTE: This is also the exact same base for chicken and dumplings. Instead of adding egg noodles to the boiling broth, mix 2 cups flour, 1T baking powder, 1tsp salt, and 1tsp pepper with 1 1/2 cups water until you have a batter. It should be thicker than pancake batter, but thinner than biscuits; add water or flour respectively depending on whether the batter is too thick or thin. (TayTip: this is basically Bisquick  minus the shortening. Use your favorite flour--all purpose, wheat, buckwheat, spelt, semolina--and quadruple the recipe without water. Keep it in an airtight container and use as the base for pancakes, dumplings, biscuits, waffles, etc. Homemade Bisquick at hand and much cheaper!) Take a large spoon and drop the dumplings right into the boiling broth so they form a layer on the top. Reduce the heat to low, and simmer for 15-20 minutes until your dumplings are cooked all the way through, but not dried out. 


The fresh herbs really are the stars of this soup. They add a flavor complexity that nothing else can. The combination of sage, rosemary, and thyme with parsley is that signature smell of savory Fall cooking. It instantly takes me back to Thanksgivings or Christmases growing up. Hearty, warm, scrumptious, and just what you need to say 'hello' to Fall. If you even have any leftover, you can pop it in a container and freeze for an entire season. Perfect for tailgates, if you're sick, rainy days inside, or anytime! Forget your soul, this chicken noodle soup is for your stomach. Buon appetito! 

Weeknight Indulgence: Gnocchi with Sweet Basil Marinara


If you haven't noticed lately, I've been eating a lot of vegetables. Like this, or these, or here, or these. As in basically only vegetables for the past week. That's because they were going to go bad I love them so much. Thus, I figured I'd treat myself with a few carbs and still throw in some fresh vegetables so I wasn't totally off the tracks. Pronounced: n-YAW-kee and traditionally made with semolina flour or potatoes. They're soft, dense pillows filled with comfort, and are definitely an indulgence. 

Start by heating 2 quarts of water over high heat to boil and add 2T of salt. Then in a separate skillet, melt 2T of butter on high heat. Dice 1/2 large red onion and saute for about 6 minutes or until softened. Then dice 1 clove of elephant garlic. This is garlic the size of shallots, and the flavor is very mild. Almost negligible. (TayTip: anytime you're cooking for a picky garlic eater, use elephant garlic; the flavor is so small, they will barely be able to taste it, but it will still give it's slightly spicy, sharp bite) Then dice three large tomatoes and throw them into the pan. Cook for 15 minutes on high or until tomatoes have softened substantially. Finally, salt and pepper to taste, and add 2T of dried sweet basil. Of course fresh herbs are always best, but the flavor of dried herbs is much more concentrated, and is helpful when putting something together fast. 

Once the water is boiling, add 1lb of packaged gnocchi and cook for 3-5 minutes, or until they rise to the surface. If I had time and patience, I'd make my own, but we're going for luxury here, so buy them pre-made. Once they float, they're done. Use a slotted spoon, or a spider to remove from the water, and toss right into the hot marinara. 


Top with freshly grated parmigiano reggiano. Remember, this is an indulgence, so use the good kind. Aren't you worth it? 


These gnocchi are little clouds of heavenly dough. They soak up the sauce like a sponge, and become completely infused with the sweet basil and tomato flavors. Dense and sticky, they're like little pasta truffles. The cheese is an ideal, salty topping, and melts instantly upon contact with this perfect comfort dish. 

What are some of your favorite comforting dishes? Do you have a go-to indulgence? Leave your comments, questions, or recipe requests below. Buon appetito!

Food Nostalgia: Cucumber and Red Onion Salad with Sweet Vinegar Dressing


My grandma used to make this for summer dinners growing up. If you can't already tell, I am heavily influenced my both of my grandmothers' and my mother's cooking styles. Cooking is not only about nourishing your body, taking care of your loved ones, and having a creative outlet, but for me, it's also about nostalgia and recreating a moment. You know how smells trigger memories? Like every time I smell the smoke from someone's fire, I think of when my family spent Christmastime in Williamsburg when I was younger. Or how peonies take me back to summers on my great-grandparents' farm in Petersburg because my MeeMaw grew them. Well food is the same way. Every time I make this salad I'm transported back to childhood, and for a moment, I'm a kid at my grandma's table again. Too little to see over the counter tops  but old enough to feel and appreciate the palpable love around. Isn't that one of the great things about life? Being able to relish and be grateful for times spent with the people who matter most? Just a little food philosophy for your Thursday. Here's how I learned it.

Start by slicing 3 large cucumbers as thin as you can get them. Use a mandolin or cheese slicer if you have them. If not, take your time with your knife. These came from my grandma's garden, which obviously makes them even better for many reasons. My mom would tell you to peel them first, (which you can do if you're picky about the skins) but I like the taste the skins add and that's where the majority of vitamins are. Immediately shower them with 1/2 cup of red wine vinegar, 2tsp of salt, 2tsp of pepper, and 1.5T of sugar. Mix them around so that they are coated with the dressing. 


Then add 1/2 of a red onion, sliced into 1.5 inch pieces. This is my own twist; grandma didn't put onion in hers, but I like the potency of red onion with the sweet cucumbers. Also add 2T of mayonnaise and mix until all ingredients are incorporated. The dressing will be very runny. 


Let it sit for a minimum of 20 minutes so the flavors can meld (as with most marinated salads/meats/fish, a few hours is best), but if you need to serve immediately, make sure you get a good amount of dressing on everyone's plate. 


Crisp, crunchy, tangy, sweet, and childhood. All in one salad. Do you have any recipes that instantly transport you back to being a kid? What memories do you recreate in the kitchen? Comments, questions, and recipe requests below! Buon appetito!

Snacketizer Part Four: Eggplant Fries with Honey


Part 4 of 4 in the vegetable snack series! There are only 4.8 carbs in 1cup of eggplant, and there are 37 carbs in one medium potato. Pretty much speaks for itself! So clearly, eggplant makes the healthier option, but potatoes make better snacks. I'm here to prove the latter wrong!

Start by preheating the oven to 325 degrees F, then slicing the eggplant into uniform, fry-sized pieces. Try to keep skin on as many pieces as you can. Place the pieces in a Ziploc bag and add 1.5T of olive oil, 1tsp of salt, and 1tsp of pepper. Massage the bag until all the pieces are coated. Place the fries in a single layer on a cookie sheet, making sure they don't touch each other. Bake for 35 minutes at 325, then turn heat up to 375 and bake for an additional 20 minutes or until the fries are no longer mushy and have turned golden.


Serve with a small cup of warm honey for dipping. 


These are firm and the skins are crisp. If you had a couple pieces that were bigger than the others, they might still be soft and not hold up. The pepper and honey create a classic, sweet and spicy combination on the palate. Plus, if you've ever had baba ganoush, you know how good roasted eggplant is. If you haven't, make these fries instead!

Comments, questions, and recipe suggestions below! Buon appetito!

Snacketizer Part Three: Roasted Red Pepper Hummus


Part three of four! Hummus is right up there alongside guacamole and salsa as a quintessential dip. It's also incredibly simple, and you only need a few, key ingredients (that most people already have in their kitchens) to make it.

Start by draining and rinsing two 15oz. cans of chick peas. This gets rid of the salty water that they're packed in. Toss them into a food processor with 2T of sesame oil and the juice of 4 small limes, which is about 1/2 cup. (TayTip: since limes don't have seeds, use the top of the blade in your food processor as a citrus reamer to get the most juice out!) Hummus is traditionally made with tahini paste, which is just ground sesame seeds, but I find that the sesame flavor isn't as prevalent when using tahini. Thus, the reasoning for the oil instead. Pulse until the chick peas are broken down. 


Next add two whole roasted red peppers. These are red bell peppers (not hot) that have been roasted over a flame or under a broiler. The best way to make your own is if you've got a gas stove with an open flame, but since mine's electric, I buy them in the jar. They're packed in a vinegar and water mixture, so drain them and toss them into the processor with 2tsp of salt and 2tsp of black pepper. Then add two garlic cloves and puree until the chick peas are broken down further. Depending on whether you like smooth or thick, you can add more olive oil, but no more sesame oil because the flavor would be too overpowering. I just love the color that the peppers add. If you look in the picture below, you can see the difference in where the peppers are incorporated/not incorporated into the hummus yet.


Perfectly smooth with a  mildly sweet, charred flavor from the peppers. It tastes like you threw in the good kind of flavor that a grill imparts. The sesame oil adds an unexpected toasty aroma, and the lime juice gives a nice pucker. Chick peas are virtually flavorless, so it's important to build a complex profile with these different ingredients. Serve with chips or crudité.


Questions, comments, and recipe requests below! Buon appetito!

Snacketizer Part Two: Roasted Spicy Squash Seeds


Part two of the series! Here is a classic case of use what you got, which is basically my MO 90% of the time. This is the first time I've ever roasted squash seeds because I normally use pumpkin or sunflower seeds. But because I made the spaghetti squash a few days ago, I had these leftover. They are packed with protein and incredibly versatile. Eat them by themselves, in a salad, on top of a crostini, wherever!

Take your seeds (I had 1 cup) and place them in a colander. If you haven't already, separate them from any squash pieces and rinse them with water. Dry your seeds and place them in a Ziploc bag. Drizzle with 1T olive oil, 1tsp salt, and 1.5tsp of ground cumin. This is the spicy part. Place them in a single layer on a cookie sheet and bake at 325 degrees F for 20-22 minutes or until they have turned a golden brown color.


They definitely satisfy the mental hand to mouth aspect of snacking, and bridge the gap between meals. I've even had people tell me they ate these when they were quitting smoking, and it helped with the nicotine cravings. They are super crunchy and have the perfect amount of spice from the cumin.

Write your questions, comments, or recipe requests below. Buon appetito!

Snacketizer: Kale Chips


It's a snack. It's an appetizer. It's a snacketizer? Yes. In keeping with the low carb, high veggie, high protein way I've been trying to eat, I decided that I needed a snack. Plus, there comes that time after lunch, and before dinner that you just want something to munch on. This is part one of a four part series on vegetable snacks. 

First are kale chips. I'd equate the texture of these to dried seaweed. If you've ever had that salty snack, you know how crispy it is. These kale chips are the same way! This kale came from my grandma's garden, and it's the small curly kind. First get a large bath towel and lie it flat on the counter. Then wash your kale thoroughly. The curls trap dirt and bugs, so you need to make sure all of that is out. Once it's cleaned, lie it on the towel to dry. Now, you need to separate the leaves from the stalks. Tear them into chip-size pieces, return them to the colander, and rinse again. Then transfer back to the towel and pat them as dry as you can get them. Next, take a salad spinner or cloth lettuce bag and get out any remaining water. Or, if you're like me and don't have either of those items, use a pillowcase. Place the kale inside, twist the top of the pillowcase, go outside (or somewhere you don't mind getting wet), and swing the bag around to get the water out. Preheat your oven to 325 degrees F. Place the kale as single layer on a cookie sheet. I had so much that I needed 3! Drizzle with olive oil and bake for 18-20 minutes. As soon as the kale has darkened in color and is crisp, remove it from the oven. I sprinkled mine with lemon Old Bay seasoning. (TayTip: always season fries, chips, etc., when they're right out of the oven or fryer. This helps the salt or seasoning stick.)


Crispy and salty and fantastic. Who knew a green leafy vegetable could make such a good chip?

Add your questions, comments, suggestions, and recipe requests below. Buon appetito!

Roasted Spaghetti Squash with Crushed Tomato Marinara and Sweet Italian Sausage


Let me just preface this post by saying that never-have-I-ever had a substitute for spaghetti that was this good.  And I was raised on pasta. As in, we had it more than one night a week growing up. Pasta definitely fills you up and tastes delicious, but the problem with eating a main course that is mostly carbs is that you feel hungry a LOT sooner after eating. That's why balancing fiber and protein in your meal is imperative. This low-carb dinner does the trick!

Roll up your sleeves, and start by prepping your squash. Just a warning: this is hard. If you've ever tried to carve a pumpkin, or cut a butternut squash, you know how tricky gourds can be. Just take your time and be careful; it's easy for your knife to get away from you when slicing through the flesh of the squash. Cut your spaghetti squash in half lengthwise until you have two pieces. Take a spoon, and scrape out the seeds, but don't throw them away; you can season and roast them for a perfect snack or in salads! Recipe for that to come later. You can see the delicate strands that make up the flesh of the squash. Season with olive oil, salt, and pepper, place them flesh side down on an oiled cookie sheet, and set in a 400 degree F oven for 30-35 minutes. 


While your squash is roasting, it's time to make the base for your crushed marinara. The texture of this sauce is incredibly substantial, and when you don't have the real pasta, you'll want something with a little bite to it. Melt 1T butter in a non-stick saute pan over med-high heat. Dice 1 large white onion, and 4 medium cloves of garlic and add to the pan. Cook until onions are somewhat caramelized and translucent. Then chop 7 large, vine-ripened tomatoes and throw in the pan with the onions. Add 1tsp salt, 1tsp ground black pepper, 1/2tsp crushed red pepper flakes, and 2tsp dried Italian herbs (these usually have oregano, basil, thyme, etc.). Cover and reduce heat to medium; cook for 20 minutes, using the back of a wooden spoon, periodically, to break down tomatoes. 


In a separate pan (I use a cast iron skillet), brown 5 large, sweet Italian sausages over high heat. (TayTip: to cook perfect sausages, always have a full measuring cup of water next to the pan. Pour about 1/2 cup in with the sausage. This allows them to cook more evenly without burning the outsides. When the water evaporates, add more. Continue this for approximately 15 minutes, then let the last batch of water evaporate and brown up the outside edges of the sausage.) Transfer the entire contents of the marinara sauce in with the sausage, and reduce heat to low. Cover, and simmer for an additional 20 minutes. The sausage will finish cooking in the sauce, but depending on your pans and stove, you'll want to make a small incision in the middle of one to make sure they're fully cooked (no longer pink). 


When your squash is done, remove from the oven, and let it cool for 10-15 minutes. Once cool, take a large serving spoon, and scoop the strands from the skin. Transfer to a large bowl and drizzle with 1T olive oil. Salt and pepper to taste. See the strands! Just like real spaghetti!


When the sauce has finished cooking, I like to scoop some of the squash strands back into the skins to serve. They're just like bread bowls from Panera, and make for a great presentation. Top with as much grated parmigiano reggiano as your little heart desires. 


This is a great meal to show off your ingenuity in the kitchen. You'll be amazed at how great a substitute it is for actual pasta. The squash is not overcooked (nobody likes mushy baby food), and gives a little resistance when biting down. It really doesn't have much of its own flavor. You get a little bit of a pumpkin/butternut squash flavor, but for the most part, it takes on the taste of the marinara, which by the way is perfectly savory. Sometimes when I make marinara, I'll add a little bit of honey to offset the acidity, but given the natural sweetness of the squash (and the sausage), I decided not to. The tomatoes are crushed and smushed and wonderfully hearty with a nice kick from the crushed red pepper. And lastly, the sweet Italian sausage. If you've had it, you know what I'm talking about. If you haven't, go buy some. These are from this wonderful shop in Arlington, VA, that my grandma used buy from when she lived there. She used to serve these for Christmas dinner with spaghetti and meatballs or her famous lasagna. The gentle fennel seed flavor is really the mark of a good sweet sausage, and it comes through with stunning clarity against the other flavors.  This is such a great meal. I felt fully satisfied, wasn't hungry later, and heck, anytime you can use a vegetable in place of a grain, I'm definitely in. 

Questions, comments, concerns below. Buon appetito!

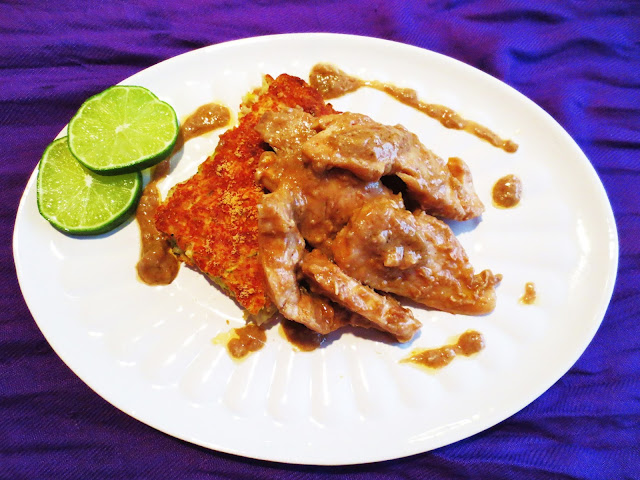
Peanut Lime Chicken with Yellow Squash and Zucchini Cakes


One day a package of chicken met a jar of peanut butter and made this little baby. What a crazy match they were. I mean, they barely knew each other and now they had just jumped into this life-long commitment together? Well it wasn't that long of a life because I ate them. Quickly. There's something shockingly magical about the combination of sour lime and creamy peanut butter. And, summer squash in all of its forms is a fabulous. PLUS, this is great way to sneak extra protein and veggies into your family's diet! 

Start by heating up 2T of coconut oil in a large skillet over med-high heat. Coconut oil has a mild flavor, and I've always found that it smells more like coconut than it tastes like it. I get more hints of vanilla than I do coconut. Try to get the virgin, cold pressed kind if you can. Next, slice 5 chicken breasts lengthwise into 1/2 inch strips. I use a meat cleaver, but if you don't have one, you can use any non-serrated knife. Trim any fat left on the meat. Season with salt and pepper and toss in the pan. 


Then dice 6 small garlic cloves as small as you can get them. Throw half of the chopped garlic into the pan with the chicken, and reserve the other half for your squash batter. Cook the chicken for about 8-10 minutes, or until almost cooked. When the meat is still slightly pink in the middle, add 1c peanut butter. I used creamy because it's what I had, but chunky works just as well, and would add an ever better texture. (TayTip: if you or your family/friends have a peanut allergy, there are a variety of other nut butters out there that will work. If you end up using walnuts or brazil nuts, add 1T of honey to the sauce to cut the bitterness.) Work the peanut butter around the chicken. It will take a couple minutes to melt and smooth out. To keep it from burning in the pan, add 1c chicken broth; this sauce will seem runny at first, but will reduce and become thicker. Depending on the type of peanut butter, you might have a lot of the separated oil from the peanuts. Skim that off the top if that's the case. Lastly, add the zest of 1 lime; about 2T. Cover, reduce the heat to low and simmer for another 15 minutes. 


Now onto make your yellow squash and zucchini cakes. This is a variation on a meal that is very close to my heart and reminds me of  my childhood. My great-grandparents had a farm in Petersburg, VA, and had a fairly expansive garden. PaPaw made breakfast every morning, and I can't tell you how many times I woke up to the smell of zucchini fritters frying in the pan. He'd pick 'em straight from the garden, and make us eat vegetables for breakfast, and everyone loved them. Hotz family cousins, you know what I'm talking about! So these cakes are like his, but a little different. It's important to not think of these as a vessel for the chicken. They have to tell their own story and depending on the direction you want to take your meal, have to have the ability to stand on their own. Start by grating 1 medium zucchini and 1 medium squash. You can use a food processor with the grater plate, or use a box stand grater like I did. (TayTip: the rule of thumb--pun intended--when hand grating is to stop when there's about a 1.5 inch stub. It's not worth losing the finger. Plus now you have something to munch on while cooking!) Now add your reserved garlic from earlier, 1/2 chopped white onion, 1/4 cup parmesan cheese (Remember when I said here that there was a time for the kind with the green lid? This is that time), 2c whole wheat flour (obviously use whatever flour you typically use for allergies or your lifestyle, but check the conversion chart if going gluten free), 1/2c cream, 2tsp salt, and 2tsp pepper. Depending on how much water was in your squash and zucchini, you may need to add more flour to balance the batter. It should be thicker than pancake batter; kind of like muffins. Now turn the oven to 350 degrees F. It's important to not preheat your oven for this cake. I've found that it makes a moister cake if you let the cream and water from the squash slowly bake and come up to temperature, rather than shocking them in a scorching oven. Butter and flour a 9x9 baking pan, add your batter, and sprinkle a little more cheese on top. Bake for 20 minutes or until a toothpick inserted in the center comes out clean, just like brownies or cupcakes. 


While your cake is baking, take the lid off your chicken and add the juice of 2 limes to the pan. The sauce will be quite thick, so this helps to rejuvenate it. Once the cake is done, cut it into 9 rectangles and serve the chicken on top. 


I consider this a kid-friendly meal; the cakes are great for snacks, and there aren't too many complex ingredients or conflicting flavors. When you taste them, you'll know what I'm talking about. The chicken is tender has a little bit of the original crust from searing it. The zest gives the initial intense lime punch, but it's softened by the peanut sauce, which is surprisingly balanced, and not too heavy. The polish of lime juice at the end perks up the whole meal. You could also use the chicken in a multitude of other ways: inside a wrap with your favorite veggies, tossed with pasta, on top of a salad, or maybe in an Asian stir fry with bean sprouts/corn/broccoli. For me, yellow squash and zucchini go together like PB&J, and the cakes are dense on the inside, and have a perfect crust on top. They stick to your ribs a little! They're not too overpowering when served with the chicken, but definitely could stand on their own. Plus, if you're dealing with picky eaters, you could always do what my mom did to make me eat my vegetables: say they're getting cookies, but they're really cucumber cookies ie. sliced cucumber. Tell them it's cake (not squash cake) and see if they complain! 

Comment below and tell me what you think! Did you make this recipe? Any allergies or dietary needs/restrictions and need more suggestions for substitutions? Let me know and we can brainstorm. Buon appetito!

Popular Posts

Followers

Copyright Taylor Maria Schultes 2013. All rights reserved. Powered by Blogger.